DEEP DIVE
🧠 It’s Just a Seat Right?
Assuming you avoid banging your head on the overhead panel the real risk comes after you’re seated.
It’s easy to ignore just how important seating position is.
If you get that wrong, and the whole setup starts to fall apart.
You might miss visual cues. You might misjudge the flare. You might struggle to reach key controls.
But the A320 cockpit isn’t just built for comfort (thank you tray table 🤗)
It’s engineered around where your eyes are meant to be.
It’s so important it’s actually written into the regs (EASA CS 25.773 if you care to look)
It’s also why you may have to do a flight deck function test if you happen to be on the edge of the ‘standard’ height range 5'2" - 6'3".
All of it is built and depends on a fixed cockpit reference.
Know as the Eye Reference Point.
BALLS
👁️ The Eye Reference Point.
The A320 cockpit is built around a fixed reference.
It’s the imaginary sweet spot where your eyes are meant to sit.
Designers use this point to size windows, position displays, and lay out controls.
If your eyes aren’t there, the whole visual picture breaks down.
Luckily, Airbus gives us a dead simple way to hit it: the eye reference indicator.

Eye Reference Indicator
Those red and white balls on the centre windshield post are not just for decoration.
Line them up so the white ball disappears behind the red one, and boom - you're where the aircraft designer wants you to be.
When you're set:
The entire PFD and ND fall into view
The glare shield doesn't block any part of your displays
You see further down the runway — useful for landing & crucial in low vis
The HUD (if fitted) actually works as intended

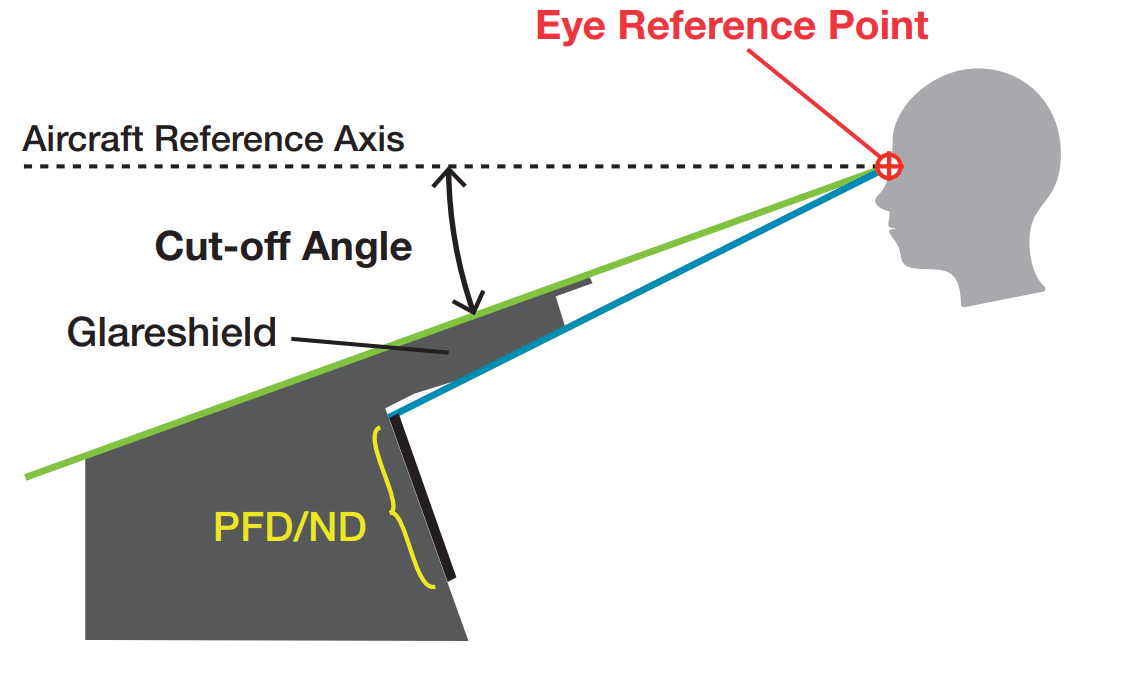
When correctly seated you should see the top of the PFD and also Glareshield.
When it comes to landing, having your eyes in the same place each time is crucial - especially when you’re new to the aircraft.
A repeatable flare can only be learnt and flown by learning the visual picture.
And the visual picture can only be learnt if it looks the same each time!
In short, if you haven’t got it by now. Your seating position matters! 🤣
COMMON MISTAKES
👇 Sitting Too Low
You settle into the seat, slide it back a bit, maybe dip the height for comfort… and now you’ve just lost a chunk of the outside world.

Sitting too low creates a blind area
From a low seating position:
The glareshield starts blocking your view of the runway ahead
Your cut-off angle shrinks — meaning you can’t see as far forward over the nose
Your visual segment shortens. Bad news in low vis or when trying to spot the PAPIs
The flare feels weird — because your eye height has shifted, you misjudge the picture

Sitting too low makes judging the flare harder
And it’s not just airborne.
On the ground, you might struggle to reach the overhead panel comfortably or lose critical situational awareness while taxiing.
👆 Sitting Too High
Sitting higher can feel great at first. You’ve got a commanding view and a bit more legroom.
However, when you’re above where the cockpit was designed for your eyes to be:
The glareshield can block the top of your PFD and ND
Important cues like FMA changes or altitude trends might go unseen
You lose some of the field of view that the ERP was meant to give you

Sitting high blocks instrumentation
It also messes with your feet:
Rudder pedal range may be compromised
You might find yourself stretching to get full travel or full brakes
And like sitting too low, your flare perspective gets warped. You might think you're higher than you are — and overcorrect.

THE THREE STEP SETUP
💺 How to Setup Your Seat
1. Seat height and distance
Adjust your seat vertically and longitudinally so your eyes line up with the ball indicator.
Don’t forget the rake (angle) of your seat back too.
Then check your screens: the glareshield should skim just above the PFD — not cut across it.

2. Armrest and sidestick
Next bring the armrest down and adjust it so your hand naturally falls onto the stick.
You want a natural grip — forearm fully supported, fingers relaxed.
This will give you precision without over-controlling.

3. Pedals
Use the lever between the pedals to adjust them.
You should be able to go full deflection and apply toe brakes without stretching.
Bonus move: Look at the index markers for your seat and pedal positions. Memorise them or jot them down. They can then act as a datum for faster setup.

Hopefully it’s obvious but the armrest and pedals deserve more respect than they usually get.
An incorrectly adjusted armrest can lead to poor sidestick inputs, because your wrist may be strained or unsupported.
Likewise the pedals are absolutely critical during engine-out, crosswind landings, or rejected take offs.


